6 min read
How to build auth with Next.js App Router and Supabase Auth
Bharat Kilaru
We're going to walk through building auth with React Server Components (RSC). Let's start by linking to the official docs from Next.js and Supabase. This getting started will help you get a basic understanding of the app router and server components. This video from the Supabase team will help you understand shifting session information from local storage to cookies.
Set up Next.js
-
Let's start by creating a new Next.js app using the Next.js CLI
npx create-next-app next-email-app --ts -
The latest version of the Next.js CLI will ask you some setup questions. You can choose your personal preference, but for the sake of the tutorial, we'll use all the defaults (press
return) - except for the experimental 'app' directory - we want to enable this!✔ Would you like to use ESLint with this project? … Yes ✔ Would you like to use `src/` directory with this project? … No ? Would you like to use experimental `app/` directory with this project? › Yes ✔ What import alias would you like configured? … @/* -
Change directories to your new app
cd next-email-app
Set up Supabase
Sign up for a Supabase account or go directly to http://database.new to spin up a new project.
Once you create, one, grab the following environment variables from the Supabase project settings to add to your Next.js app's .env.local
NEXT_PUBLIC_SUPABASE_URL=your supabase url
NEXT_PUBLIC_SUPABASE_ANON_KEY=your supabase anon key
Use the NEXT_PUBLIC prefix to make sure these keys are available on your client. You can also add in Vercel directly if you are deploying there and use
vercel env pull .env.localto stay in sync with your deployment settings
Create a new table in Supabase. In our case, we're going to make one called 'cities'.
Enable Row Level Security (RLS) - we'll walk through how policies work here when dealing with Next.js server components.
Configure your columns as you'd like. We're going to create id, created_at , and title columns with type int8, timestamptz with default now(), and string respectively.
Add some rows to your newly created table for cities of your choosing, like "San Francisco", "New York City", and "Chicago".
Row Level Security (RLS)
Click the RLS policy for your new table and click 'New Policy'. You can get started quickly with one of the existing templates: "Enable Read Access for everyone":
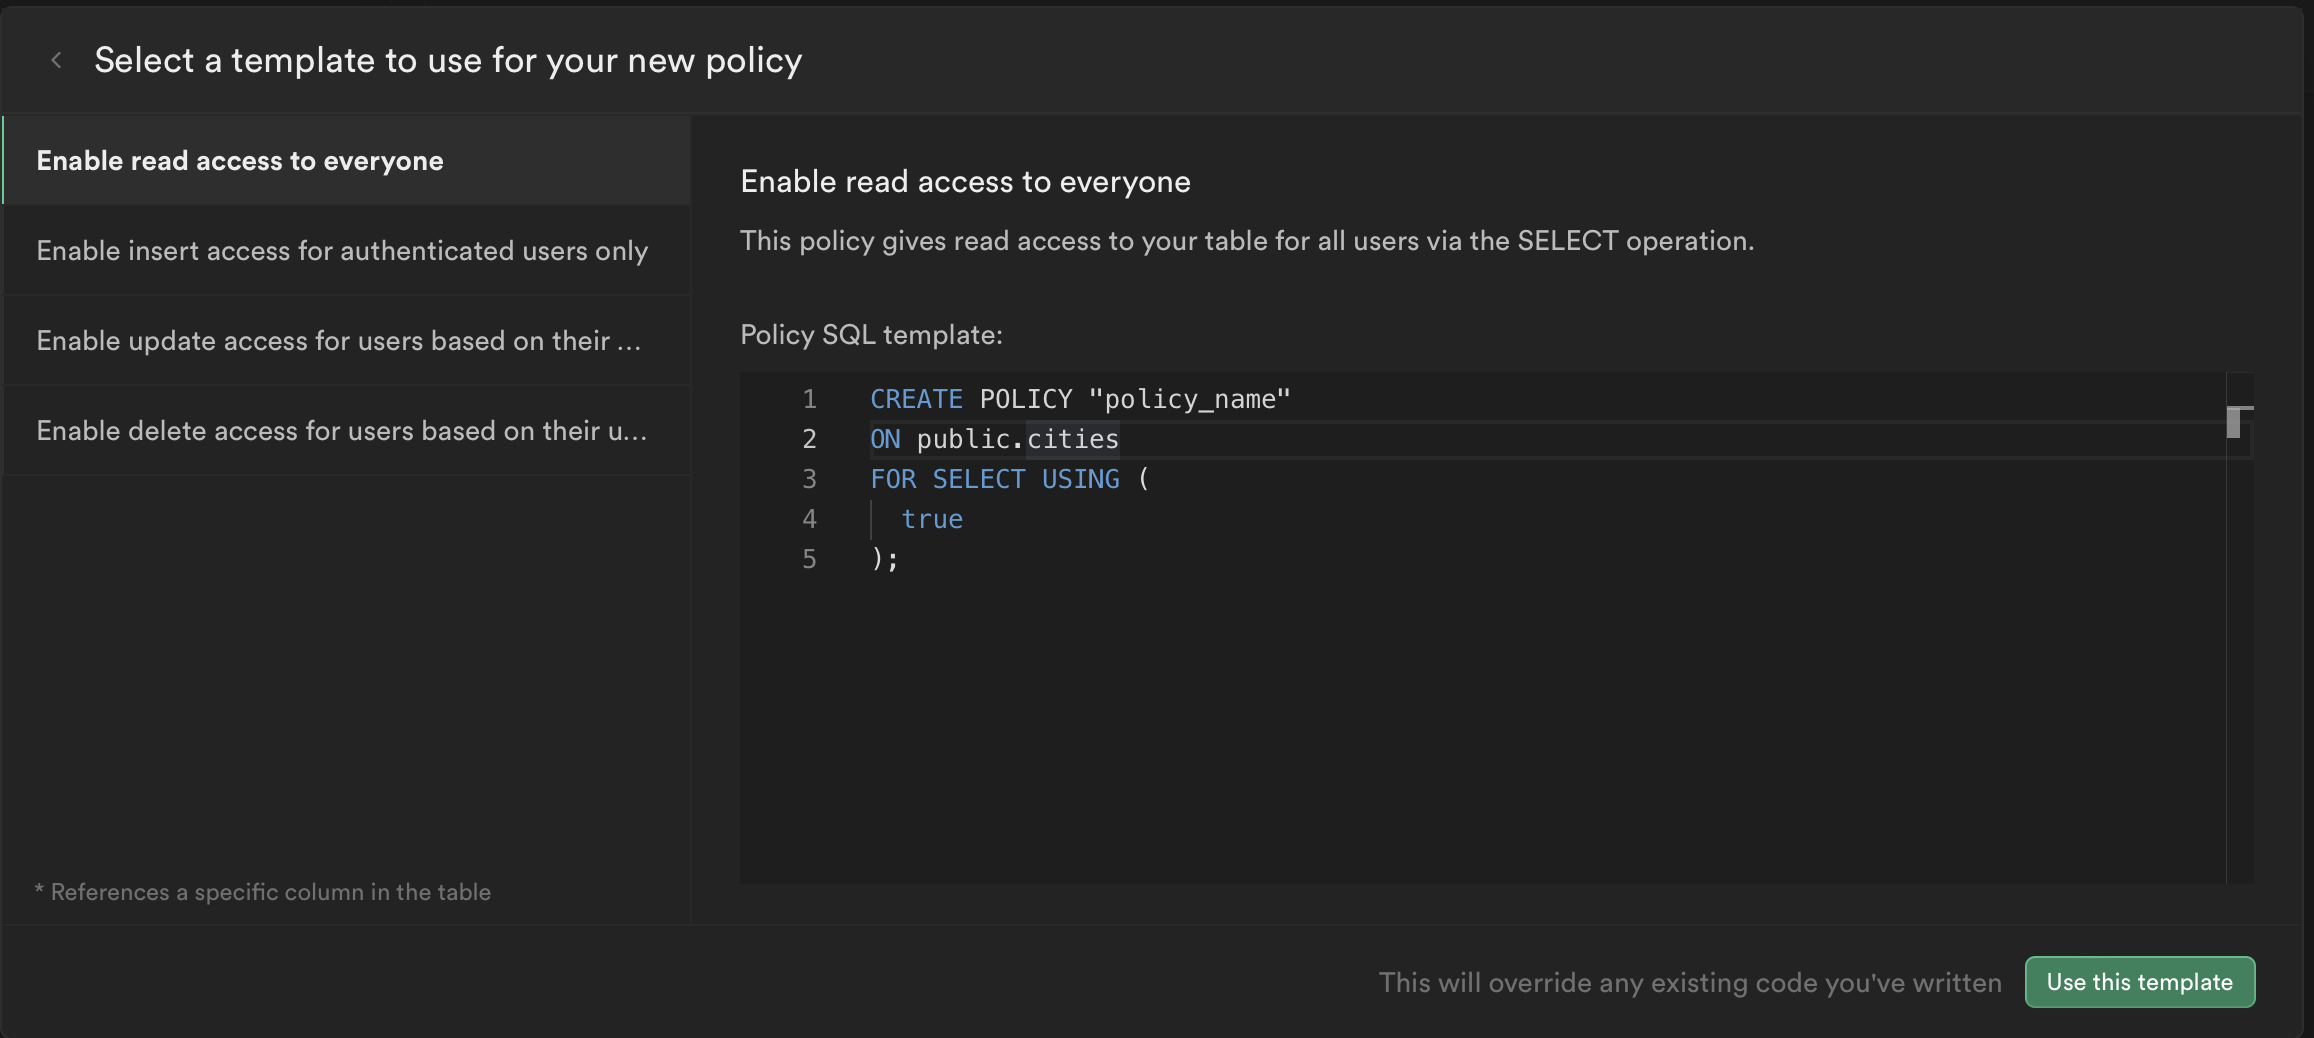
This will allow us to easily explore data setup and then push for more strict policies as we add in authentication.
App Directory
Understand here that the app directory replaces the previous pages directory as your routing system and a construct for your pages will be rendered. At our root, is a layout.tsx component that pulls in your head component and children - in this case the page.tsx component.
Consider this your app's landing page. And here we're going to demonstrate how to fetch data from Supabase using the new createServerComponentSupabaseClient auth helper.
Server
In our page.tsx, we are going to add the following:
import { createServerComponentSupabaseClient } from "@supabase/auth-helpers-nextjs";
import { headers, cookies } from "next/headers";

export const revalidate = 0;

export default async function Posts() {
  // This is a server component

  const supabase = createServerComponentSupabaseClient({
    headers,
    cookies,
  });

  const { data: posts } = await supabase.from("cities").select();

  console.log("posts", posts);
  return <pre>{JSON.stringify(posts, null, 2)}</pre>;
}
Why did we add
export const revalidate = 0? Try removing it and then adding/removing rows to your table. You may notice that we're not fetching data in sync any more with your table. That's because the server is cacheing data for us. To dynamically fetch new data, we can leverage revalidation as a technique to custom control how we fetch new information.
Browser
We're going to create a new subdirectory called signin, which will be the new signin route for your app. In that subdirectory, let's create a page.tsx component that will reflect the content of our sign in page.
"use client";
import Registration from "@/components/registration";

export default function SignIn() {
  return <Registration />;
}
The use client label at the top of the page denotes this as a client component rather than a server one. This will allow us to leverage specific client side React code implementation that we're used to already. In this case, I'm importing a new Registration component I've added to my components directory called Registration.tsx
import { createBrowserSupabaseClient } from "@supabase/auth-helpers-nextjs";
import { useRouter } from "next/navigation";
import { useEffect, useState } from "react";

export default function Registration() {
  const [supabase] = useState(() => createBrowserSupabaseClient());
  const router = useRouter();

  useEffect(() => {
    const {
      data: { subscription },
    } = supabase.auth.onAuthStateChange((event, session) => {
      router.refresh();
    });

    return () => {
      subscription.unsubscribe();
    };
  }, [supabase, router]);

  const signOut = () => {
    supabase.auth.signOut();
  };
  const signUp = () => {
    supabase.auth.signUp({
      email: "hello@neorepo.com",
      password: "password",
    });
  };

  const signIn = () => {
    supabase.auth.signInWithPassword({
      email: "hello@neorepo.com",
      password: "password",
    });
  };
  return (
    <div>
      <button onClick={signUp}>Sign Up</button>
      <button onClick={signIn}>Sign In</button>
      <button onClick={signOut}>Sign Out</button>
    </div>
  );
}
Here, we're using createBrowserSupabaseClient from our Supabase auth helpers to leverage our client side Supabase connection. This allows us to use our traditional Supabase auth actions.
What about router.refresh()? Well we're going to now test how our client side auth actions bridge with our server implementation to only show data for authenticated users.
Let's also now update our RLS, so we can make our policy strict to only those who are logged in. Remove the current policy and replace with the following:
Middleware
We need to allow the user session to be available on the server, so our initial server component can successfully fetch data and display that back to the user.
The secret to this is moving our session data from local storage to cookies.
To do this, we'll be using createMiddlewareSupabaseClient in our middleware.ts file. This allows our server to access the session and fetch data successfully via our supabase-auth-token
import { createMiddlewareSupabaseClient } from "@supabase/auth-helpers-nextjs";
import { NextResponse } from "next/server";

import type { NextRequest } from "next/server";

export async function middleware(req: NextRequest) {
  const res = NextResponse.next();
  const supabaseClient = createMiddlewareSupabaseClient({
    req,
    res,
  });

  await supabaseClient.auth.getSession();

  return res;
}
How does the server know to refetch the data? That's where the router implementation on our client comes in. Our router.refresh() triggers with our useEffect that monitors Supabase auth changes.
useEffect(() => {
  const {
    data: { subscription },
  } = supabase.auth.onAuthStateChange((event, session) => {
    router.refresh();
  });

  return () => {
    subscription.unsubscribe();
  };
}, [supabase, router]);Overall
Getting used to server components involves understanding how user session information gets translated from client side actions to your new server components.
Supabase has facilitated this process tremendously with their auth helpers, which handle server, client, and middleware for you.
Neorepo is a production-ready SaaS boilerplate
Skip the tedious parts of building auth, org management, payments, and emails
See the demo© 2023 Roadtrip